
Nurse practitioner credentialing is the process of verifying an NP’s education, licensure, board certifications, and professional background to ensure they meet the standards required by healthcare organizations, insurance payers, and state regulatory bodies. It enables nurse practitioners to obtain in-network status with insurance companies, gain hospital privileges, and bill independently for clinical services under their own NPI number.
The average nurse practitioner medical credentialing process takes 90 to 120 days from start to finish. Every month of delay can cost a practice between $15,000 and $25,000 in lost revenue from unbillable services. That is not a minor inconvenience. It is a revenue problem that compounds with every passing week.
This checklist walks you through every document and step in the exact order that works. Follow it, and you will avoid the most common delays that keep NPs from seeing patients and getting paid.
NP Credentialing Checklist
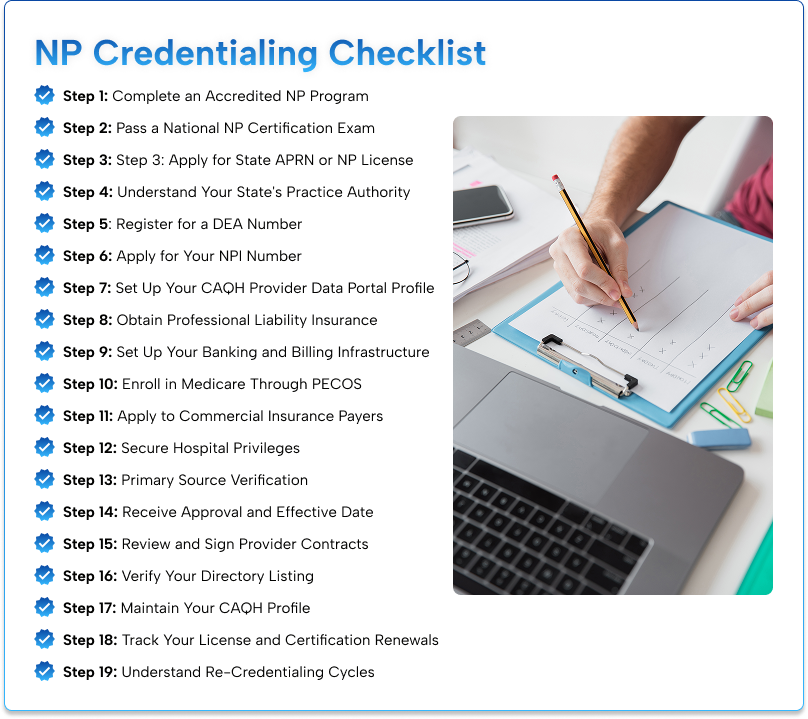
Step 1: Complete an Accredited NP Program
Your first requirement is graduation from a master’s or doctoral program in nursing. The program must be accredited by a recognized body.
Documents You Need:
- Official transcripts from your NP program showing the degree conferral date
- Official transcripts from your RN program
- Diploma or degree certificate
- Clinical hour logs (minimum 500 hours) with site name, address, and preceptor credentials
Watch Out For: Starting in 2026, the American Nurses Credentialing Center (ANCC) requires APRN certification candidates to apply within five years of degree conferral.
If you graduated more than five years ago and never got certified, you cannot use that degree for ANCC certification anymore.
This does not affect renewals, but it does mean you cannot sit on your degree indefinitely.
Step 2: Pass a National NP Certification Exam
Board certification is required before any payer or hospital will look at your application.
Recognized Certifying Bodies:
| Certifying Body | Common Certifications | Specialty Focus |
| American Nurses Credentialing Center (ANCC) | FNP-BC, PMHNP-BC, AGACNP-BC, AGPCNP-BC | Multiple specialties |
| American Academy of Nurse Practitioners (AANP) | FNP-C, A-GNP-C, ENP-C | Family and adult-gerontology |
| National Certification Corporation (NCC) | NNP-BC, WHNP-BC | Neonatal, women’s health |
| Pediatric Nursing Certification Board (PNCB) | CPNP-PC, CPNP-AC | Pediatric |
| Oncology Nurses Certification Corporation | AOCNP | Oncology |
| AACN Certification Corporation | ACCNS-AG, CCRN | Acute/critical care |
| National Board on Certification of Hospice and Palliative Nurses | ACHPN | Hospice/palliative |
Documents You Need:
- A certification certificate showing your specialty, certification number, and expiration date
- Copy of your certification card
Application Timeline: Certification agencies recommend completing your application for testing two to three months before you plan to take the exam. Official transcripts must be submitted by the university in a separate, sealed envelope.
Step 3: Apply for State APRN or NP License
Your RN license is not enough. You need a separate license as an Advanced Practice Registered Nurse or Nurse Practitioner from your state Board of Nursing.
New Mexico Requirements (Example):
- Hold a current, unencumbered RN license in New Mexico or a compact multi-state RN license
- Complete a graduate-level nursing program designed for NP education
- Provide evidence of successful completion of national certification
- Document date of graduation, credentials conferred, and number of supervised clinical hours
Documents You Need:
- Active RN license in your state
- Official transcripts from your NP program
- National certification documentation
- Completed state application form
- Application fee (typically $75 to $400)
- Fingerprints and criminal background check
Processing Time: State boards vary wildly. Some process in two weeks. Others take three to four months. Check your state board’s website for current processing times.
Step 4: Understand Your State’s Practice Authority
This matters more for credentialing than most people realize. Payers will ask about your supervision arrangements because it affects how they process claims.
- Full Practice Authority States (26 states + DC): No collaborative agreement needed. You practice independently under the state board of nursing.
- Reduced Practice States: You need a collaborative agreement with a physician. Payers will require a copy of that fully executed agreement before processing your application.
- Restricted Practice States: You need direct physician supervision. The supervision arrangement must be documented and submitted.
Documents Needed for Reduced or Restricted States:
- Fully executed collaborative agreement or supervision agreement
- Not a draft. Not a verbal promise. A signed document.
Critical Warning: In reduced or restricted states, that collaborative agreement is not just a formality. It is a required credentialing document. Payers will not process your application without a current, fully executed copy. Get it in place before you submit anything.
Step 5: Register for a DEA Number
If you plan to prescribe controlled substances, you need a DEA registration from the Drug Enforcement Administration.
Documents You Need:
- DEA certificate showing your registration number and expiration date
- State Controlled Dangerous Substance certificate (if your state requires one)
Current Fee: $888 for a three-year term.
Watch Out For: Some states require a separate Controlled Dangerous Substance certificate. Federal DEA registration does not always satisfy state requirements.
Practical Tip: Even if you do not plan to prescribe controlled substances right away, some payers still request your DEA number during credentialing. Having it ready prevents back-and-forth delays that can add weeks to your timeline.
Step 6: Apply for Your NPI Number
Your National Provider Identifier is the single most important number in your credentialing life. It is the 10-digit unique identifier that follows you across every payer, every claim, and every enrollment application.
How to Apply: The National Plan and Provider Enumeration System (NPPES) website. The application is free.
Processing Time: One to two business days when you apply online.
Documents You Need:
- Personal information
- Education history
- Practice address
- State license number
Critical Distinction: You need a Type 1 NPI for yourself as an individual practitioner. If you are opening your own practice or forming a group, you will also need a Type 2 NPI for the organization. Do not confuse the two. Claims billed under the wrong NPI type get denied.
Step 7: Set Up Your CAQH Provider Data Portal Profile
This step is where the real credentialing work begins. CAQH is the centralized credentialing database that most commercial payers use. You complete your profile once, and payers pull your data from CAQH instead of making you fill out the same forms a dozen times.
Name Change Note: As of June 6, 2025, CAQH officially renamed ProView to the CAQH Provider Data Portal. The platform functions the same way.
Documents You Need:
- Demographics (name, address, contact information)
- Education history with dates and degrees
- State licensure information for every state where you hold a license
- National certification details
- Malpractice insurance coverage information
- Practice locations
- Work history for the past five years with month-and-year dates
- Professional references
The Re-Attestation Trap: CAQH requires you to re-attest to your profile approximately every 120 days. Miss the re-attestation deadline, and your profile goes inactive. When that happens, every pending payer application tied to your CAQH data stalls. Set a calendar reminder. Treat this like a recurring billing task, not a one-time setup.
Step 8: Obtain Professional Liability Insurance
You need malpractice insurance before any payer will credential you. The coverage requirements vary by state, by employer, and by individual payer.
Typical Coverage Levels: $1 million per occurrence / $3 million aggregate is common.
Documents You Need:
- Certificate of insurance showing your name, coverage limits, policy number, and effective dates
Critical Distinction: If you are joining an existing practice, the practice’s policy may cover you. But some payers still require you to carry your own separate policy. Check before assuming you are covered.
Step 9: Set Up Your Banking and Billing Infrastructure
Before you can get paid, you need somewhere for the money to go.
Documents Needed for Electronic Funds Transfer (EFT):
- Voided check or bank letter confirming your account
- Completed CMS-588 form for Medicare EFT
- Similar forms for each commercial payer
Documents Needed for Electronic Remittance Advice (ERA):
- ERA enrollment forms for each payer
- Designation of where you want the remittance advice sent
Practical Tip: Set up EFT and ERA at the same time you submit your credentialing applications. Do not wait until you are approved. The approval letter will come, and you will be ready to start physician billing immediately instead of waiting another two weeks for banking setup.
Step 10: Enroll in Medicare Through PECOS
Medicare enrollment happens through PECOS (Provider Enrollment, Chain, and Ownership System). This is a separate system from CAQH. You cannot skip it.
Which Form to File:
- Individual NPs file the CMS-855I application
- If you are joining or forming a group practice, you will also need a CMS-855B for reassignment of benefits
Documents Needed for CMS-855I :
- Signed and dated application (original signatures in blue ink preferred)
- Copy of state NP license (notarized or certified true copy)
- Copy of national certification
- Copy of DEA certificate (if applicable)
- Malpractice insurance certificate
- Work history for the past five years
- EFT Authorization Agreement (CMS-588)
- NPI verification from NPPES
Processing Time: Typically, 45 to 65 days. Online submissions through PECOS move faster than paper applications.
Signature Rule: All signatures must be original and signed in ink. Stamped, faxed, or copied signatures will not be accepted.
Step 11: Apply to Commercial Insurance Payers
With your CAQH profile complete, you can start applying to individual commercial payers. Each one has its own application process, even if they pull your data from CAQH.
Target Payers by Market:
- Medicare and Medicaid
- BCBS (your local affiliate)
- UnitedHealthcare
- Aetna
- Cigna
- Humana
- Tricare
- Regional or local plans in your area
Processing Time: 60 to 120 days per payer.
The Phone Call That Saves Months: Before you invest hours in an application, call the payer’s provider enrollment line. Ask two questions: Do they credential nurse practitioners in your specialty? And is their provider panel currently open in your area? If the answer to either question is no, move to the next payer.
Documents Needed for Each Payer:
- CAQH ID number
- State NP license
- National certification
- DEA certificate
- Malpractice insurance
- W-9 form
- Collaborative agreement (if your state requires it)
Warning: Not all health plans credential NPs separately. Some require NPs to bill under a supervising physician’s NPI. A quick phone call can save you months of wasted effort.
Step 12: Secure Hospital Privileges
If you plan to practice in a hospital, surgical center, or any facility-based setting, you need clinical privileges through that facility’s medical staff office.
Documents Needed:
- Completed application for Allied Health Professional Membership
- Signed National Practitioner Data Bank form
- Signed Medical Staff Bylaws/Rules and Regulations form
- Curriculum Vitae
- NP/PA licenses
- DEA license
- CPR certification (BLS, ACLS, PALS, NALS)
- NPI number
- Signed position description
- Proctoring plan
- Core standardized procedures
- Request for procedural privileges with procedural logs
Processing Time: Six weeks to three months, depending on the facility’s committee meeting schedule.
The Admitting Privileges Trap: Even if you are outpatient only, many payers require either admitting privileges at an in-network hospital or an admitting arrangement letter from a physician who has them. Miss this detail, and your application gets denied.
Step 13: Primary Source Verification
Once your applications are in, payers and facilities independently verify everything you submitted. This is not a rubber stamp. It is a line-by-line check.
What They Verify:
- Schools confirm your degrees directly
- State boards confirm your license status
- Certifying bodies confirm your board certification
- Previous employers confirm your work history
- The OIG exclusion list and SAM database are checked
- The National Practitioner Data Bank is searched
What Causes Delays: Incomplete records. Unexplained gaps in your work history. A six-month gap with no explanation triggers additional review. Keep your CV detailed with month-and-year entries for every position.
Common Slow-Downs:
- State boards replying late, especially during renewal season
- Schools taking weeks to release transcripts
- Wrong certificate numbers or missing signatures sending files back for fixes
Step 14: Receive Approval and Effective Date
When primary source verification clears, you will receive an approval letter from each payer. The letter includes your effective date, which is the date you can start billing under your own NPI.
Critical Rule: Claims submitted for dates of service before the effective date get denied.
Step 15: Review and Sign Provider Contracts
Do not sign a contract without reading it. Do not assume the rates are fair. Do not assume you cannot negotiate.
What to Check in the Contract:
- Fee schedules for your most common codes
- Timely filing limits
- Appeal rights and deadlines
- Termination notices periods
- Reimbursement for telehealth services
- Incident-to billing provisions
Negotiation Tip: In full practice authority states, you have more leverage because you practice independently. Either way, you do not have to accept the first rates offered.
Step 16: Verify Your Directory Listing
Once contracted, check the payer’s online provider directory. Verify that your name, address, specialty, phone number, and “accepting new patients” status are all accurate.
Directory errors mean patients cannot find you. In some states, inaccurate directory data can trigger payment delays.
Step 17: Maintain Your CAQH Profile
Your CAQH profile is not a one-time task. It requires ongoing maintenance.
Re-Attestation Schedule: Every 120 days. CAQH will send reminders. Do not ignore them. An inactive profile freezes all payer applications tied to it.
Update Triggers: Any time your address changes, your license renews, your certification updates, or your malpractice policy changes, update your CAQH profile immediately.
Step 18: Track Your License and Certification Renewals
NP state license: Renew on your state board’s schedule (typically every 1 to 3 years)
RN license: Keep it active. Your NP license is tied to it.
National certification: Renew every 5 years. Some certifying bodies require continuing education hours.
DEA registration: Renew every 3 years. Current fee is $888.
Maintaining Licensure: Some jurisdictions require NPs to maintain clinical NP practice to remain registered. In Ontario, Canada, NPs must declare whether they have practiced in a clinical role within the previous three years.
Step 19: Understand Re-Credentialing Cycles
Credentialing is not permanent. Payers re-credential providers on a regular schedule.
- Typical Re-Credentialing Cycle: Every 3 years for commercial payers. Every 5 years for Medicare.
- What You Need for Re-Credentialing: The same documents as initial credentialing, but updated. Current licenses. Current certification. Current malpractice insurance. Updated work history.
Warning: Re-credentialing applications can be denied if your profile has gaps or your documentation is expired. Treat re-credentialing with the same seriousness as initial credentialing.
| Complete Documents Checklist
Education Documents
Certification Documents
Licensure Documents
Practice Documents
Identification Documents
Work History
Background Checks
Payer Applications
|
Average Timeline
| Phase | Duration | Error Risk |
| Credentialing (Primary Source Verification) | 30–45 days | High (30-40% rejection rate on first submissions) |
| Payer Enrollment | 30–45 days | Moderate |
| Hospital Privileging | 15–30 days | Low |
Best-case scenario: 60 days
Typical scenario: 90–120 days
Worst-case scenario: 6+ months
Conclusion
NP credentialing process takes 90 to 120 days on average. This involves a dozen different agencies and databases, and requires relentless follow-up. But the work is worth it. Being credentialed under your own NPI means you can bill independently, negotiate your own rates, and build your own patient panel.
The checklist above gives you the complete roadmap. Start with education and certification. Move through state licensure. Get your NPI and CAQH profile. Secure malpractice insurance. Enroll in Medicare and commercial payers. Follow up every two weeks. Maintain your credentials after approval.
Simplify Your NP Credentialing Process with RCM Xpert
Credentialing delays can postpone patient care, insurance reimbursements, and revenue generation for months. Whether you’re a newly licensed Nurse Practitioner, launching your own practice, or expanding into new payer networks, RCM Xpert Medical Billing Services can help streamline the entire credentialing and enrollment process.
Our credentialing specialists handle every stage of the process, including:
✔ CAQH Provider Data Portal Setup & Maintenance
✔ NPI Registration & Updates
✔ Medicare & Medicaid Enrollment
✔ Commercial Insurance Credentialing
✔ Hospital Privileging Assistance
✔ Re-Credentialing & Compliance Tracking
✔ Credentialing Status Follow-Up
✔ Multi-State Enrollment Support
With years of experience supporting healthcare providers across New York and nationwide, our team helps reduce credentialing delays, improve approval rates, and accelerate your path to reimbursement.
Get Started Today
📞 740-766-6083
📧 info@rcmxpert.com
🌐 www.rcmxpert.com
RCM Xpert Medical Billing Services — Helping Nurse Practitioners Get Credentialed Faster and Paid Sooner.